Introduction
You found the perfect logo online. A crisp JPG file. You want to stitch it out on your Husqvarna Viking machine. But when you load the file, nothing happens. Or worse, the design looks like a tangled mess. The problem is simple: your machine speaks HUS, not JPG. So how do you properly Convert JPG to HUS Embroidery Files without losing your mind? I will show you exactly how the pros do it. No confusing jargon, no hidden steps. Just a clear path from a flat image to a stitch-ready design that your Viking machine will love.
What Is a HUS File Anyway?
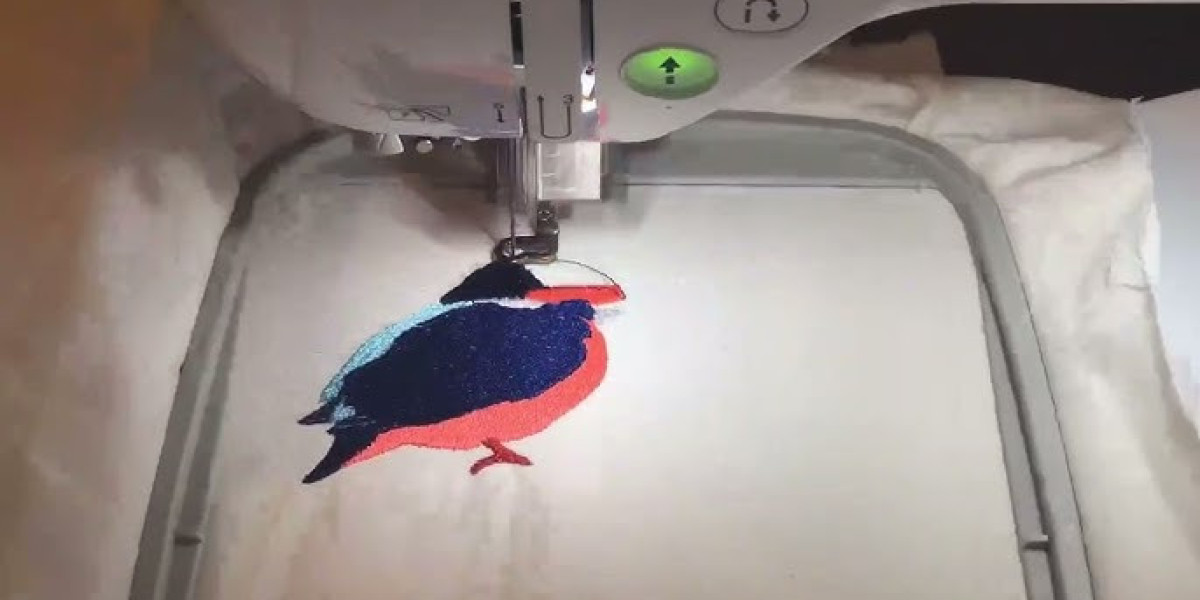
Before we get into the how, let us talk about the what. A HUS file is the native embroidery format for Husqvarna Viking machines . Think of it as the language your machine understands perfectly. Unlike a JPG, which holds pixel information for a screen, a HUS file contains stitch-by-stitch instructions. It tells your machine exactly where to drop the needle, how long each stitch should be, when to jump to a new location, and when to cut the thread .
Here is something many beginners miss. HUS files are primarily used by older Husqvarna Viking models. If you have a newer Viking machine, you might need VP3 format instead . Check your machine manual before you start converting. Using the wrong format means your machine simply refuses to read the file. No error message, no warning. Just a blank screen and a lot of frustration.
Why You Cannot Just Change the File Extension
I see this mistake constantly. Someone renames a .jpg file to .hus and wonders why their machine still will not read it. Changing the extension does nothing. It is like putting a Ferrari badge on a bicycle and expecting it to go 200 miles per hour. The internal data stays the same. Your JPG still has zero stitch information .
Real conversion requires digitizing software. That software analyzes your image, identifies shapes and colors, and creates actual stitch data. It decides where to put satin stitches for letters, where to use fills for large areas, and how to handle fine details. That is the only way to get a working HUS file.
The Software You Actually Need
You do not need to spend thousands on high-end software to get started. Here are the tools that work for converting JPG to HUS.
Wilcom EmbroideryStudio and Hatch are the professional standards. They offer full manual digitizing control and export directly to HUS format. But they cost serious money and have a learning curve.
Embrilliance Essentials is a more budget-friendly option that many home embroiderers love. It handles HUS export well and offers basic auto-digitizing features .
Pulse software works great if you already use it for other machines. Just make sure you select the correct HUS variant for your specific Viking model .
Free options exist, but I do not recommend them. Most free converters produce garbage files that stitch poorly or crash your machine. Pay for reliable software. Your time and fabric are worth more than the few dollars you save.
Step-by-Step Conversion Process
Let me walk you through the exact steps I use.
Step one: clean up your source image. Open your JPG in any photo editor. Crop out extra white space. Remove complicated backgrounds. Flatten your colors to a handful of solid shades . Your Viking machine cannot sew gradients. It will try to represent them with dozens of tiny color blocks, creating a mess.
Step two: import your image into your digitizing software. Set the design size now. Resizing after digitizing often destroys stitch density. A design that looks perfect at 4 inches will stitch poorly at 6 inches if you just scale it up later.
Step three: choose auto-digitizing or manual digitizing. Auto-digitizing works fine for simple designs with bold shapes and limited colors. Click a button and the software generates stitches automatically. For complex logos with small text or fine details, manual digitizing gives much better results. You trace each shape yourself and assign specific stitch types.
Step four: adjust your stitch settings. Set your maximum stitch length to around 12 millimeters. Anything longer causes looping and snagging. Set your minimum stitch length to 0.4 millimeters. Shorter stitches cause needle deflection and thread fraying . Add underlay stitches to every design. Underlay anchors your fabric and prevents shifting. Skipping underlay is the fastest way to get a wobbly, misaligned mess.
Step five: export as HUS. Go to Export or Save As. Select HUS from the format list. Keep your file name simple. Use only letters, numbers, and underscores. No spaces, no special characters. Many Viking machines refuse to display files with long or complicated names .
USB Drive Setup That Actually Works
Here is where many people get stuck. You converted your file correctly, but your machine still does not see it. The problem is often your USB drive.
Use a USB 2.0 drive. Newer USB 3.0 drives often confuse older embroidery machines. Keep the drive size small. 2GB to 16GB works best. Larger drives may not be recognized at all .
Format your drive to FAT32. Not NTFS. Not exFAT. Most machines only read FAT32. Use a Windows computer to format the drive if possible. Mac-formatted FAT32 drives sometimes cause issues .
Place your HUS file directly in the root folder. Do not put it inside subfolders unless your machine specifically supports folder navigation. Many Viking machines only look at the top level of the drive .
Common Problems and Fixes
Your machine says file not supported. This usually means you exported to the wrong format. Double-check that your machine uses HUS and not VP3. Newer Viking models prefer VP3 .
Your design stitches but looks wrong. The most common cause is missing underlay or incorrect pull compensation. Go back to your software, add underlay stitches, and increase pull compensation by 5 to 10 percent. Test again.
Thread keeps breaking during the sew-out. Your stitch density is too high or your stitch angles are too sharp. Reduce density by about 15 percent. Smooth out any sharp corners in your digitizing.
The machine does the dance. Your Viking machine moves the hoop up and down before continuing. This usually happens because your file contains trim commands that the machine is processing. It is normal behavior for some models . If you find it annoying, check your machine settings for an option to disable advanced jump trimming.
The design shows up but is tiny. Your hoop size setting in the software does not match the actual hoop on your machine. Set the correct hoop size before exporting .
Converting Existing HUS Files
Maybe you already have a HUS file but need to make changes. The problem is that HUS files are not easily editable. They are stitch files, not working files.
The better approach is to keep your original working file. If you digitized the design yourself, save it in your software's native format like .EMB or .PXF. That gives you full editability. Only export to HUS when you are ready to sew .
If all you have is a HUS file and you need to edit it, import it back into your software. Make your changes. Then re-export to HUS. Be aware that converting a file back and forth can introduce errors. Some stitch data may be lost or changed during each conversion .
Manual vs Auto for HUS Conversion
Let me be direct with you. Auto-digitizing works fine for simple designs. Think basic shapes, block letters, simple logos. You upload your JPG, click a button, and the software spits out a HUS file. It takes seconds.
But auto-digitizing has serious limits. It struggles with small text. It cannot handle gradients or shadows. It often misinterprets photo-style images. And it almost never gets underlay and pull compensation right.
Manual digitizing takes longer but produces professional results. You control every stitch. You add proper underlay. You adjust pull compensation for your specific fabric. You decide exactly how the design stitches.
My recommendation for most home embroiderers is to start with auto-digitizing for simple projects. As you gain experience, learn manual digitizing for the designs that matter. Or outsource complex designs to a professional digitizer who can deliver a perfect HUS file.
Conclusion
Converting a JPG to a HUS file is not magic. It is a process. You need the right software, the right settings, and a little patience. Clean up your source image first. Use reliable digitizing software. Add underlay and adjust your stitch settings. Export to the correct HUS format. Put the file on a properly formatted USB drive. And always test on scrap fabric before you sew the final product.
Your Husqvarna Viking machine is a precision tool. Feed it well-converted HUS files, and it will reward you with clean, sharp embroidery every time. Rush the conversion or skip steps, and you will spend your weekend unpicking thread nests. The choice is yours. Now go convert that design.