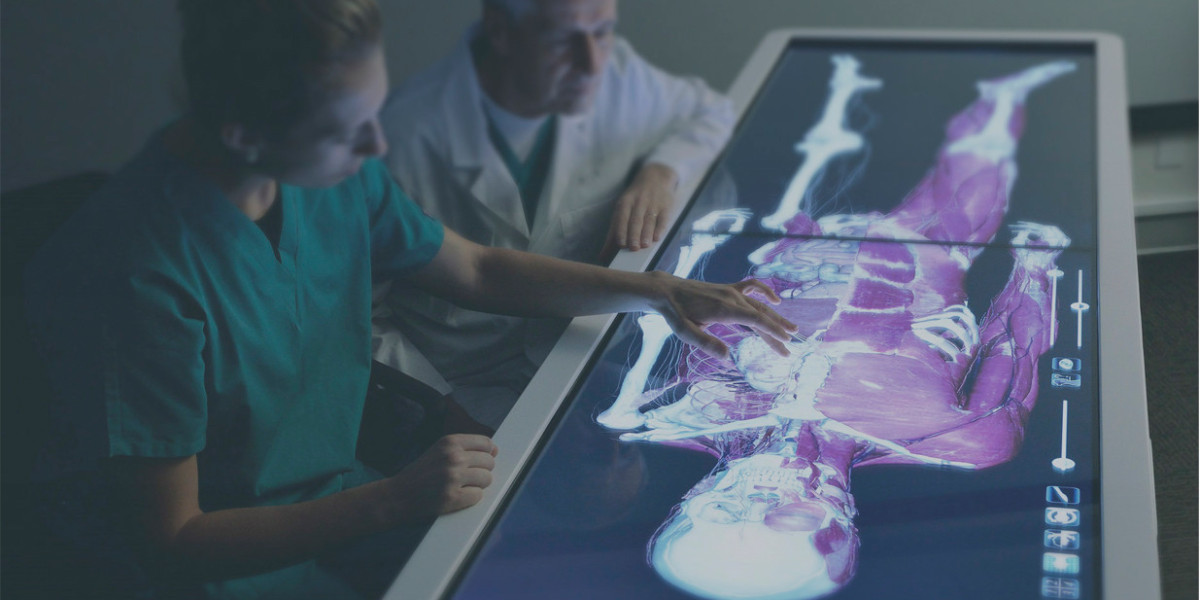
Medical education has always had a core challenge: helping students build a reliable mental map of the human body while simultaneously learning how that anatomy appears in real clinical practice. Textbooks and atlases are essential, but they ask learners to translate flat images into spatial relationships. Cadaver labs provide realism, yet access can be limited by scheduling, resources, and variability. A high-resolution interactive 3D anatomy table helps bridge these worlds by offering digital dissection with the clarity of modern visualization and the structure of classroom teaching.
What makes this format especially useful is that it supports both foundational learning and clinical reasoning. Students can explore anatomy by layers, systems, or regions, then switch context to imaging-like views and pathology comparisons without leaving the same learning environment.
Why seeing anatomy is not the same as understanding it
Many students can memorize labels and still struggle with orientation: Where does a structure begin and end? What sits anterior or posterior? What’s superficial vs deep? Which paths do vessels or nerves take through a region? A 3D anatomy table targets this gap by letting learners manipulate anatomy in space—rotate, zoom, isolate, hide, and make structures semi-transparent to understand relationships rather than just names.
This matters because clinical questions rarely arrive as “Name this muscle.” They arrive as patterns: pain distribution, neurological deficits, breathing changes, or imaging findings. When a student can spatially trace structures and compare layers, learning shifts from memorization to reasoning.
Digital dissection that behaves like a lab, with classroom flexibility
A major strength of an interactive anatomy table is the digital dissection workflow. Instead of one fixed view, learners can “cut” through the body in standard anatomical planes and explore layered anatomy—skin to muscle to bone to organ—without time constraints.
In practice, it supports several teaching styles:
Layer-first teaching: surface anatomy to deeper structures
System-first teaching: cardiovascular, nervous, musculoskeletal, and more
Region-first teaching: thorax, abdomen, pelvis, head and neck, limbs
Because structures can be hidden, removed, or made semi-transparent, instructors can build a progression: “Here’s the whole region, now isolate vessels, now reveal nerves, now compare to muscles.” It also reduces a common classroom bottleneck: the “one diagram for 30 students” problem. A digital table encourages group exploration, discussion, and repeated demonstrations without needing to reset physical specimens.
A 4K touchscreen is more than a display feature
Resolution and interaction matter in anatomy education because students learn by pointing, tracing, and revisiting small structures. A 4K touchscreen allows instructors and learners to manipulate detailed models directly—pinch, rotate, highlight, and zoom—with less friction between intent and action.
The benefit is subtle but real: it keeps teaching momentum. Instead of pausing to interpret a static image, the class can test ideas immediately:
If this is the liver, what sits posterior to it?
Follow that vessel—where does it branch next?
If a surgeon approaches from this angle, what structures are at risk?
When the tool supports fast exploration, it invites better questions.
Building reusable lessons with saved scenes and annotations
Anatomy instruction works best when it’s structured. Educators often build “standard scenes” for repeat use: a typical heart view, a thoracic cavity demonstration, a pelvic floor overview, or a cranial nerve pathway setup. The ability to create teaching scenes, add annotations, and reuse them across lessons turns anatomy teaching into a consistent library rather than a one-time performance.
This is especially helpful when multiple instructors teach different modules. Shared scenes keep terminology and visual references consistent across a course, reducing confusion and making assessments more fair.
Linking anatomy to CT, MRI, and ultrasound thinking
One of the toughest transitions for students is learning to recognize anatomy through imaging. Cross-sectional views can feel abstract until the learner understands what a plane represents and how it intersects a structure.
A strong interactive anatomy table can support radiology-style learning by allowing exploration in standard planes and reinforcing https://medvisionsim.com/simulators/3d-anatomy-table-s-vision orientation. Some curricula also use fixed probe-position concepts to help learners understand ultrasound windows and what structures should appear in each view.
This supports three valuable outcomes:
Plane literacy: students learn how axial, coronal, and sagittal cuts translate into real anatomy
Orientation confidence: they recognize structures by shape and relationship, not only by labels
Clinical relevance: anatomy becomes linked to how clinicians actually see the body in practice
Learning pathology through comparison, not just theory
Anatomy becomes more meaningful when students can compare healthy structure to pathological change. When learners can explore how disease alters shape, boundaries, or relationships between structures, they start building pattern recognition earlier.
Even if the goal remains foundational education, pathology comparisons make anatomy easier to remember because it connects structures to real clinical consequences: what changes, what stays constant, and why certain findings matter.
Knowledge checks that support measurable progress
Students often feel confident after a lecture and realize gaps only during exam week. Built-in quizzes or knowledge checks can change that. Immediate feedback helps learners spot weak regions early, repeat targeted review, and improve systematically.
For instructors, this can also support teaching decisions—showing which modules are consistently difficult, where more practical demonstrations are needed, and how different cohorts progress over time.
Functional anatomy: from structure to movement and mechanism
Anatomy becomes “sticky” when it connects to function. Tools that support functional anatomy—muscle actions, joint mechanics, system interactions, and visual demonstrations of movement—help students answer real clinical questions: What happens when a muscle is weak? Why does an injury create that limitation? Which structures are affected by a certain movement pattern?
This is especially relevant for physiotherapy, sports medicine, orthopedics, rehabilitation, and for clinical training where movement assessment is part of patient care.
Supporting cadaver learning and improving access
Cadaver work remains valuable, but access can be uneven across institutions. Digital dissection can provide a consistent baseline for students who have limited lab hours and can serve as a strong companion for those who do have cadaver exposure.
It supports:
pre-lab preparation so students arrive oriented
post-lab reinforcement to clarify what was seen
structured revision for exams and rotations
The goal isn’t to replace cadaver learning, but to make anatomical understanding more consistent and accessible.
Embryology as a bridge to “why anatomy looks like this”
Embryology can feel abstract when it’s taught separately from adult anatomy. Visual, interactive embryology content helps students connect development to adult structure and to common clinical anomalies.
When learners can see how structures rotate, migrate, or fuse during development, adult anatomy becomes more logical—and variations become easier to understand instead of feeling like random exceptions.
How educators can use it across different formats
A key advantage of an interactive anatomy table is flexibility. It can work in:
large-group teaching and demonstrations
small-group problem-based sessions
individual self-study with structured tasks
hybrid setups where content is shared across screens or devices
Institutions rarely teach anatomy in only one way. Tools that support multiple formats tend to stay useful even when curriculum design evolves.
Conclusion
A modern interactive 3D anatomy table can function as a complete learning ecosystem: digital dissection, multi-plane exploration, layer and system teaching, imaging-oriented views, pathology comparison, knowledge checks, functional anatomy support, and structured lesson-building with saved scenes.
In the classroom, this shifts anatomy from passive viewing to active exploration. For students, it helps replace fragile memorization with spatial understanding and clinical correlation. For educators, it provides consistency, scalability, and a repeatable way to teach anatomy in a world where teaching time is limited and expectations are high.